Can Read only API controller send 200 and 400 responses based on model validation?
Real use of Action filter with data annotations
In ASP.NET Core, filters provide a mechanism to run custom logic before or after a controller action. Sometimes, you may need to apply a filter to just a specific controller, especially if that controller is readonly and cannot be modified. This post demonstrates how to use a custom filter for model validation, and how to register it specifically for the UsersController without changing its implementation.
We’ll cover:
Creating a custom model validation filter.
Applying the filter to a specific readonly controller.
Ensuring model validation is handled through data annotations in the model.
What are Filters in ASP.NET Core?
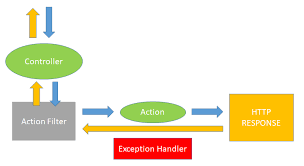
Filters in ASP.NET Core run code before or after specific stages in the request processing pipeline. The most common types of filters are:
Action Filters: Run before and after action methods.
Exception Filters: Handle exceptions thrown by actions.
Authorization Filters: Handle authorization logic.
Result Filters: Run after an action method has executed and just before the result is sent to the client.
For this example, we'll focus on action filters, particularly to handle model validation before an action is executed.
Why Use Filters for Controller-Specific Logic?
There are cases where you need to apply filters to a single controller:
Modular design: Each controller may need specific behaviors, such as validation rules or logging.
Readonly controllers: If your controller is autogenerated, readonly, or part of a third-party package, you might not be able to modify it.
By using filters, we can apply custom logic—like model validation—without changing the controller’s code.
User Model with Data Annotations
We'll define a UserModel that uses data annotations for validation. The following rules will be enforced:
Idshould have a minimum length of 5 characters and a maximum of 255.Nameshould be between 2 and 30 characters long and start with an uppercase letter.Dateshould be greater than 1/1/1900 and less than today's date.
Step 1: Define the Model with Data Annotations
using System;
using System.ComponentModel.DataAnnotations;

public class UserModel
{
    [Required(ErrorMessage = "Id is required.")]
    [MinLength(5, ErrorMessage = "Id must be at least 5 characters long.")]
    [MaxLength(255, ErrorMessage = "Id cannot exceed 255 characters.")]
    public string Id { get; set; }

    [Required(ErrorMessage = "Name is required.")]
    [MinLength(2, ErrorMessage = "Name must be at least 2 characters long.")]
    [MaxLength(30, ErrorMessage = "Name cannot exceed 30 characters.")]
    [CapitalizedFirstLetter(ErrorMessage = "The first letter of the Name must be uppercase.")]
    public string Name { get; set; }

    [Required(ErrorMessage = "Date is required.")]
    [DataType(DataType.Date)]
    [Range(typeof(DateTime), "1900-01-01", null, ErrorMessage = "Date must be greater than 1/1/1900 and less than today.")]
    public DateTime Date { get; set; }
}
We’re using built-in validation attributes like [Required], [MinLength], [MaxLength], and [Range]. For the first letter of the Name to be capitalized, we’ll create a custom validation attribute.
Custom Validation Attribute for Name Capitalization
using System.ComponentModel.DataAnnotations;

public class CapitalizedFirstLetterAttribute : ValidationAttribute
{
    protected override ValidationResult IsValid(object value, ValidationContext validationContext)
    {
        var name = value as string;
        if (!string.IsNullOrEmpty(name) && char.IsUpper(name[0]))
        {
            return ValidationResult.Success;
        }
        return new ValidationResult(ErrorMessage ?? "The first letter must be uppercase.");
    }
}
Custom Model Validation Filter
Next, we'll create a custom filter to validate the model before the controller action executes. This will intercept the request, check if the model is valid, and return a 400 Bad Request if validation fails.
Step 2: Create a Custom Action Filter
using Microsoft.AspNetCore.Mvc;
using Microsoft.AspNetCore.Mvc.Filters;

public class ValidateModelFilter : IActionFilter
{
    public void OnActionExecuting(ActionExecutingContext context)
    {
        // Check if the model is valid
        if (!context.ModelState.IsValid)
        {
            // Return 400 Bad Request with the validation errors
            context.Result = new BadRequestObjectResult(context.ModelState);
        }
    }

    public void OnActionExecuted(ActionExecutedContext context)
    {
        // No action required after the action method execution
    }
}
The filter checks whether the ModelState is valid. If it’s invalid, a 400 Bad Request is returned along with the validation errors.
Registering the Filter for UsersController
Instead of applying this filter globally, we’ll apply it only to the UsersController without modifying the controller itself.
Step 3: Configure the Filter for a Specific Controller
You can register the filter for the UsersController in Startup.cs (or Program.cs if using .NET 6+). Here’s how:
public void ConfigureServices(IServiceCollection services)
{
    services.AddControllers(options =>
    {
        // Apply the filter only for UsersController
        options.Filters.Add(new TypeFilterAttribute(typeof(ValidateModelFilter)));
    });
}
This way, the filter will be applied to the UsersController without touching its code.
Readonly UsersController Action
Finally, here’s the readonly UsersController that cannot be modified. The action method simply returns 200 OK. We cannot directly modify it to handle validation logic, but the filter we applied will take care of that for us.
Step 4: UsersController (ReadOnly Code)
using Microsoft.AspNetCore.Mvc;

[ApiController]
[Route("api/[controller]")]
public class UsersController : ControllerBase
{
    private readonly UserService _userService;

    public UsersController(UserService userService)
    {
        _userService = userService;
    }

    [HttpPost]
    public IActionResult CreateUser([FromBody] UserModel model)
    {
        return Ok(); // Will only be called if model validation succeeds
    }
}
This controller is readonly, meaning we cannot modify it to handle validation or other logic directly. The custom filter we created will ensure that:
If the model is valid, the action will return
200 OK.If the model is invalid, the filter will return a
400 Bad Requestwith detailed error messages.
Conclusion
In this post, we demonstrated how to use custom action filters to handle model validation in ASP.NET Core, applying the filter only to a specific readonly controller. Using a filter allows you to keep your controller's logic clean and reusable while enforcing validation constraints.
Data annotations ensure that the model properties are validated based on business rules.
Filters allow us to handle cross-cutting concerns, like validation, without modifying the controller code.
By leveraging filters and model validation, you can ensure that requests with invalid data never reach your controller's core logic.


