
Azure SQL Server Integration in .NET Core: Replacing On-Premises SQL Server
Transitioning from Traditional SQL Server to Cloud-Based Azure SQL


Migrating from on-premises SQL Server to Azure SQL Server is a common modernization step for cloud-native applications. Azure SQL provides a fully managed Database-as-a-Service (DBaaS) solution that reduces maintenance overhead, improves scalability, and enhances security.
In this blog, we’ll cover:
✅ Key differences between SQL Server and Azure SQL
✅ How to set up an Azure SQL database
✅ How to connect and integrate Azure SQL with .NET Core
✅ Best practices for a smooth transition
SQL Server vs Azure SQL: What's Different?
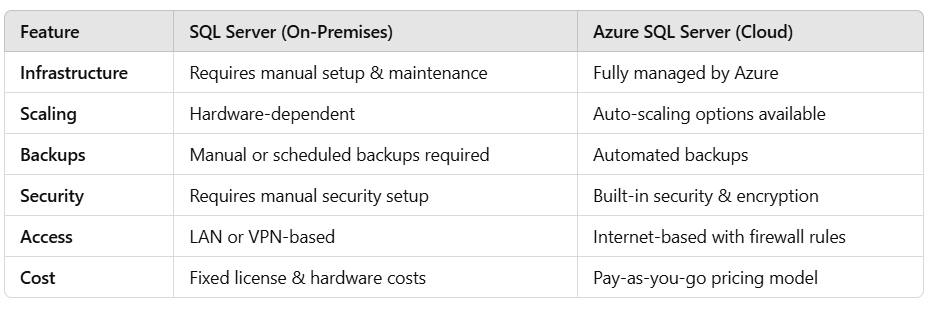
Why Move to Azure SQL Server?
✅ No hardware maintenance – Microsoft handles infrastructure.
✅ Automatic backups & high availability – Ensures data durability.
✅ Built-in security – Advanced encryption and threat protection.
✅ Elastic scalability – Pay for what you use.
Setting Up Azure SQL Server
Step 1: Create an Azure SQL Database
Go to Azure Portal.
Search for SQL Database and click Create.
Fill in the details:
Subscription: Select your Azure subscription.
Resource Group: Create or select an existing one.
Database Name: e.g.,
MyAzureDb.Server: Click Create new and enter:
Server name: Unique name (e.g.,
myazuresqlserver.database.windows.net).Region: Choose a location close to your users.
Authentication: Use SQL authentication and set a strong password.
Click Next: Networking, set Public endpoint (or private for security).
Click Review + Create, then Create.
Step 2: Configure Firewall Rules
By default, Azure SQL blocks all external access. To allow access from your machine:
Open your Azure SQL Server.
Go to Networking → Firewall Rules.
Click Add Client IP (or enter IP range).
Click Save.
Connecting .NET Core to Azure SQL
Step 1: Install SQL Client Package
Run the following command in your .NET Core project:
dotnet add package Microsoft.Data.SqlClient
Step 2: Update Connection String in appsettings.json
Modify your configuration file to use the Azure SQL Server connection string.
{
  "ConnectionStrings": {
    "DefaultConnection": "Server=tcp:myazuresqlserver.database.windows.net,1433;Initial Catalog=MyAzureDb;Persist Security Info=False;User ID=your_username;Password=your_password;MultipleActiveResultSets=False;Encrypt=True;TrustServerCertificate=False;Connection Timeout=30;"
  }
}
Security Tip: Never store credentials in plain text. Use Azure Key Vault for secret management.
Step 3: Create a Database Context in .NET Core
If using Entity Framework Core, create a DbContext class:
using Microsoft.EntityFrameworkCore;

public class ApplicationDbContext : DbContext
{
    public ApplicationDbContext(DbContextOptions<ApplicationDbContext> options) : base(options) { }

    public DbSet<Product> Products { get; set; }
}

public class Product
{
    public int Id { get; set; }
    public string Name { get; set; }
    public decimal Price { get; set; }
}
Step 4: Register DB Context in Program.cs
Modify your Program.cs to inject DbContext using dependency injection.
using Microsoft.EntityFrameworkCore;

var builder = WebApplication.CreateBuilder(args);

builder.Services.AddDbContext<ApplicationDbContext>(options =>
    options.UseSqlServer(builder.Configuration.GetConnectionString("DefaultConnection")));

var app = builder.Build();

app.Run();
Step 5: Apply Migrations & Update Database
Run these commands to create tables in Azure SQL:
dotnet ef migrations add InitialCreate
dotnet ef database update
✅ Done! Your .NET Core application is now using Azure SQL Server. 🚀
Querying Data from Azure SQL
Example: Fetching Data from Azure SQL
Create an API endpoint to fetch products from the database.
using Microsoft.AspNetCore.Mvc;
using Microsoft.EntityFrameworkCore;

[ApiController]
[Route("api/[controller]")]
public class ProductsController : ControllerBase
{
    private readonly ApplicationDbContext _context;

    public ProductsController(ApplicationDbContext context)
    {
        _context = context;
    }

    [HttpGet]
    public async Task<IActionResult> GetProducts()
    {
        var products = await _context.Products.ToListAsync();
        return Ok(products);
    }
}
Now, you can access the API:
GET http://localhost:5000/api/products
Best Practices for Using Azure SQL in .NET Core
✅ Use Managed Identity for Authentication
Replace SQL authentication with Azure Managed Identity for better security.
✅ Enable Azure Defender for SQL
Detects threats like SQL injection automatically.
✅ Use Read-Only Replicas for Performance
For heavy read operations, use Geo-Replication to distribute queries.
✅ Enable Query Performance Insights
Monitor slow queries using Azure SQL Query Performance Insights.
✅ Optimize Database with Indexing
Analyze slow queries and create indexes:
CREATE INDEX idx_product_name ON Products(Name);
✅ Use Connection Pooling
Ensure better performance using DbContextPooling:
builder.Services.AddDbContextPool<ApplicationDbContext>(options =>
    options.UseSqlServer(builder.Configuration.GetConnectionString("DefaultConnection")));
Conclusion
Migrating from on-premises SQL Server to Azure SQL modernizes your applications with better scalability, security, and performance. With minimal changes, your .NET Core application can start leveraging cloud-powered SQL databases.
🚀 Start integrating Azure SQL today and future-proof your applications!
Have questions or migration challenges? Drop a comment below! 👇