
Azure Redis Cache vs. Local Containerized Redis: Which One’s Right for Your .NET Core Web API?
Experiment with both, and find the perfect match!


In today’s high-speed application world, performance and scalability are paramount, especially for data-heavy .NET Core web APIs. That’s where Redis Cache steps in, offering ultra-fast data retrieval by caching frequently accessed information. But the question remains: Should you go with Azure Redis Cache or a local containerized Redis instance? Let’s break down both options, compare them, and even set up each one with a .NET Core Web API. By the end, you’ll know exactly which solution works best for your needs!
📌Explore more at: https://dotnet-fullstack-dev.blogspot.com/
🌟 Restack would be appreciated! 🚀
🚀 What is Redis, and Why Use It in .NET Core?
Redis is an in-memory data store that works like a hyper-fast dictionary to store and retrieve data using keys, making it ideal for caching, session storage, and even real-time analytics. For .NET Core apps, Redis can significantly reduce database load and improve response times for frequently accessed data.
🔍 Comparing Azure Redis Cache and Local Containerized Redis
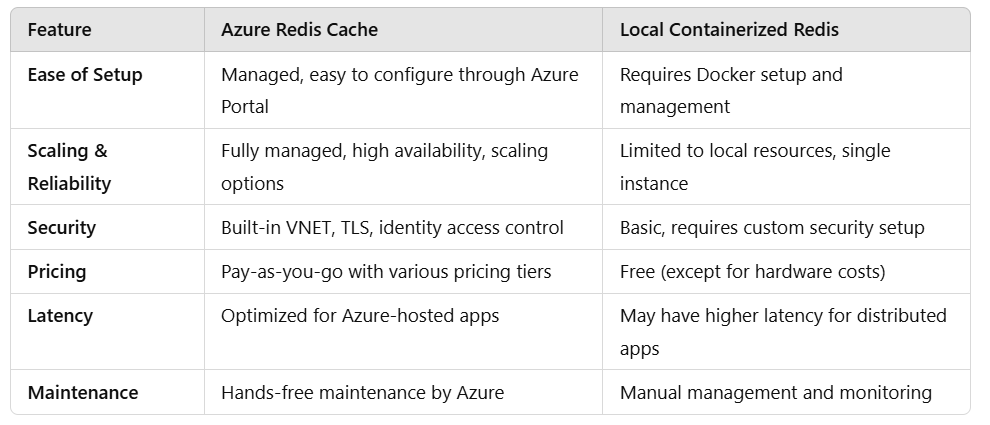
Now that we know the pros and cons of each, let’s dive into setting up both options!
Option 1: Setting Up Azure Redis Cache in a .NET Core Web API
If you’re hosting your app in Azure, this option keeps everything tightly integrated. Follow these steps to configure and connect to Azure Redis Cache.
Step 1: Create an Azure Redis Cache Instance
Log into the Azure Portal.
Search for “Azure Cache for Redis” and click Create.
Select Resource Group, and name your Redis instance.
Choose a pricing tier based on your performance needs.
Review and create the instance.
Once created, go to your Redis instance and locate the Access Keys. Copy the Primary connection string as you’ll need it to connect in your .NET Core app.
Step 2: Connect Your .NET Core API to Azure Redis
Add the Redis NuGet package:
dotnet add package Microsoft.Extensions.Caching.StackExchangeRedis
Configure Redis in appsettings.json:
{
  "ConnectionStrings": {
    "Redis": "your_azure_redis_connection_string"
  }
}
Configure Services in Startup.cs:
public class Startup
{
    public void ConfigureServices(IServiceCollection services)
    {
        services.AddStackExchangeRedisCache(options =>
        {
            options.Configuration = Configuration.GetConnectionString("Redis");
            options.InstanceName = "AzureRedis_";
        });

        services.AddControllers();
    }
}
Step 3: Using Azure Redis in Your Controller
You’re now ready to use Redis! Here’s a quick example of caching some data in an API controller:
[ApiController]
[Route("api/[controller]")]
public class SampleController : ControllerBase
{
    private readonly IDistributedCache _cache;

    public SampleController(IDistributedCache cache)
    {
        _cache = cache;
    }

    [HttpGet("{key}")]
    public async Task<IActionResult> Get(string key)
    {
        var cachedValue = await _cache.GetStringAsync(key);

        if (cachedValue == null)
        {
            cachedValue = $"Value for {key} generated at {DateTime.Now}";
            await _cache.SetStringAsync(key, cachedValue, new DistributedCacheEntryOptions
            {
                AbsoluteExpirationRelativeToNow = TimeSpan.FromMinutes(5)
            });
        }

        return Ok(cachedValue);
    }
}
Option 2: Setting Up a Local Containerized Redis Instance in Docker
For development, testing, or local-only caching needs, a containerized Redis instance on Docker is lightweight and easy to set up.
Step 1: Start Redis with Docker
Install Docker and use the following command to start a Redis container:
docker run --name my-redis -p 6379:6379 -d redis
This command pulls the latest Redis image and starts it on port 6379.
Step 2: Connect Your .NET Core API to Local Redis
Update appsettings.json with your local Redis connection string:
{
  "ConnectionStrings": {
    "Redis": "localhost:6379"
  }
}
Configure Redis in Startup.cs:
public class Startup
{
    public void ConfigureServices(IServiceCollection services)
    {
        services.AddStackExchangeRedisCache(options =>
        {
            options.Configuration = Configuration.GetConnectionString("Redis");
            options.InstanceName = "LocalRedis_";
        });

        services.AddControllers();
    }
}
Add Sample Controller (reuse the sample controller from the Azure Redis section).
Now, with docker run, you’ll have a local Redis instance serving your .NET Core app! This setup is perfect for local testing and simulates how Redis caching would work in production.
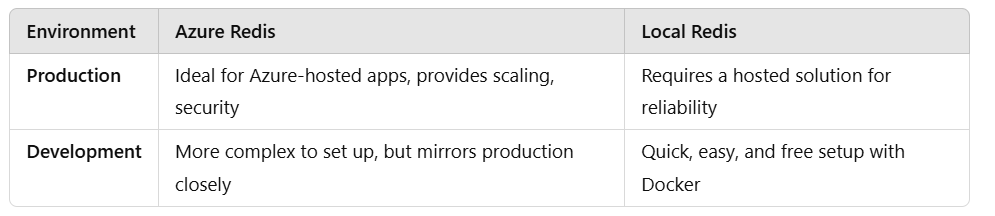
Pros and Cons: Azure Redis vs. Local Redis for Production and Development
⚡ Which One Should You Choose?
Go with Azure Redis if:
Your app is hosted in Azure.
You want built-in scaling, security, and minimal maintenance.
Cost isn’t a constraint, and you need high availability.
Use Local Redis (Docker) if:
You’re in a development/testing environment.
You want a lightweight, quick, and free caching solution.
You’re not handling production-level scaling and security concerns.
💡 Additional Tips
Distributed Caching: If you have multiple instances of your API, Redis is designed for distributed caching and works seamlessly across them.
Key Expiration: Set expiration times to avoid stale data in cache, especially for rapidly changing data.
Monitor Redis Usage: Track your cache hit/miss ratio in production to optimize cache utilization.
Final Thoughts: Choosing the Right Caching Strategy
Choosing between Azure Redis Cache and local containerized Redis depends heavily on your application’s environment and scaling needs. Azure Redis Cache is unmatched for production use in Azure, providing robust, hands-free management and security. Local Redis, meanwhile, offers a fantastic, lightweight solution for local development.
Experiment with both, and find the perfect Redis setup that makes your .NET Core Web API lightning fast!